Showing posts with label Cupcakes. Show all posts

Monday, March 5, 2012

Recipe: Strawberry Cupcakes


We love celebrating birthdays in our house.  My girls especially like to celebrate their teacher's birthdays so when one of our teachers had a birthday last month, I made some strawberry cupcakes.  I have seen several blogs that have made these adorable roses on cakes and cupcakes.  They appeared to be so daunting, but after looking at this blog, I realized I was being a big baby and they were really easy.  

I could have also gone the easy route and made the cupcakes from a box mix, but I wanted up my game. I used this recipe that I found on the blog, Apron of Grace, that I had pinned a while back and I am so glad that I found it.  It is a bit more work than just throwing it together from the box, but it is worth it.  I actually had a small bag of frozen strawberries that I put in a saucepan and reduced down to a thick yummy juice.  I smashed the strawberries with a fork and left them a bit on the chunky side.  I also decided to skip adding the red food coloring which made by cupcakes a pale pink, which I loved.  If you want a bright pink, then add the red food coloring.

I made enough cupcakes for all the teachers and students in the third grade.  My kids loved the cupcakes and I was so glad that I tried something new.  I will be decorating all kinds of cupcakes and cakes with this new rose technique.  I think a beautiful cake decorated with all roses for Mother's Day would be so beautiful.

Enjoy!


Strawberry Cupcakes
{original recipe by Apron of Grace}
Ingredients
    For the Cupcakes
    • 1 cup butter, room temperature
    • 2 1/2 cups sugar
    • 2 egg yolks
    • 5 egg whites
    • 1 tsp vanilla extract
    • 1 tsp red food coloring
    • 1 1/4 cups pureed strawberries
    • 3 cups cake flour, sifted
    • 1 tsp baking powder
    • 1 tsp baking soda
    • pinch salt
    • 1 cup buttermilk

    For the Frosting
    • 1 - 8oz pkg cream cheese, room temperature
    • 1/2 cup butter, room temperature
    • 1/3 cup half and half/whipping cream
    • 1 tsp vanilla
    • 1 tsp red food coloring
    • 1 lb. powdered sugar

    Instructions

    For the Cupcakes
    1. Preheat oven to 350 degrees.
    2. Line cupcake tin with liners.
    3. In a medium bowl, beat butter with sugar for 3 minutes.
    4. Add egg yolks one at a time, then the vanilla, food coloring and strawberries, beat for another 3 minutes.
    5. Sift dry ingredients and add to butter/egg mixture alternately with buttermilk, beginning and ending with the dry ingredients., mixing just till combined.
    6. In another bowl and clean beaters, beat egg whites till stiff and add in an increment of 3 to cake batter, being sure to fold in thoroughly but gently.
    7. Bake for 12 to 18 minutes for cupcakes and 20-25 minutes for 9 inch round cake pans.
    8. Remove from oven and allow to cool completely before frosting.
    For the Frosting
    1. In a medium bowl, add cream cheese and butter, whip till light and creamy, about 3 minutes.
    2. Add liquids and blend.
    3. Slowly add powdered sugar while mixing.
    4. At this point you may need to add more powdered sugar. You are trying to achieve a medium stiff consistency. Whip for several minutes.
    To Make the Roses
    1. Using a 1M tip, fill the pastry bag with frosting. 
    2. To make your rose, start in the center, then slowly move your tip in a circle around the center point.
    Powered by Recipage


    Linked To:
    *My Sweet and Savory: My Meatless Monday
    *The Southern Institute: Creative Me Link Up
    *Boogieboard Cottage: Masterpiece Monday
    *Mrs. Happy Homemaker: Makin' You Crave Monday
    *11th Heaven's Homemaker Monday: Homemaker Monday
    *The Sweet Spot: Recipe Party Time
    *Talking Dollar and Cents: Muffin Monday
    *DIY Home Sweet Home: More the Merrier
    *Make Ahead Meals for Busy Moms: Melt in Your Mouth Monday
    *Flour Me with Love: Mix It Up Monday
    *Delightfully Dowling: Mangia Monday
    *A Southern Fairytale: Mouthwatering Monday
    *Marvelously Messy: A Marvelous Mess
    *Sumo's Sweet Stuff: Market Yourself Monday
    *Skip To My Lou: Made By You Monday
    *Blessed with Grace: Tempt My Tummy Tuesday
    *It's A Blog Party: Delicious Dishes
    *Mandy's Recipe Box: Totally Tasty Tuesday
    *Hoosier Homemade: Cupcake Tuesday
    *33 Shades of Green: Tasty Tuesday
    *Permanent Posies: Tuesday's Tasty Tidbits
    *Reasons to Skip the Housework:  Tuesday Time Out
    *Chef in Training: Tuesday Talent Show
    *BruCrew Life: Treak or Treat Tuesday
    *From Mess Hall to Bistro: Made From Scratch Tuesday
    *Sweetology: Tea Party Tuesday
    *Crazy for Crust: Crazy Sweet Tuesday
    *Two Maids a Milking: 2 Maids a Baking
    *Bizzy Bakes: Bake with Bizzy
    *Talking Dollar and Cents: Sweet Tempations
    *Miz Helen's Country Cottage: Full Plate Thursday
    *A Little Nosh: Tastetastic Thursday
    *Something Swanky: Sweet Treat Friday
    *Alli-n-Sons: Sweet Tooth Friday
    *Food Corner: Decorating Challenge

    Saturday, December 31, 2011

    Countdown to 2012: Best Desserts

     Countdown to 2011 with Finding Joy in My Kitchen


    I am so excited to be joining SnoWhite at Finding Joy in My Kitchen for her annual countdown.  I participated last year and it was interesting to look back on my blog to see the recipes that I made over the past year.

    I love to bake!  I didn't get to bake as much as I like to this year with the very long heat wave that we went through here in Texas.  It was just too hot to turn the oven on unless I had to.  However, I did manage to make some desserts that my family and friends loved.  Here were our favorites:


    Sunday, November 20, 2011

    Recipe: Blue Velvet Cupcakes with Cream Cheese Frosting


    This year, my daughter decided she didn't want pink cupcakes to celebrate her birthday with her classmates.  She wanted blue and white (our school colors) cupcakes to celebrate our varsity girl volleyball team that went to the state championship and come home ranked third in our great big state of Texas.  Go Lady Cougars! 

    Well, I aim to please my baby girl but I had planned on making white cupcakes with pretty pink frosting.  I turned to the internet in search of blue velvet cupcakes and found several recipes.  A couple of recipes I found weren't exactly blue but a shade of green with a blue tint.   I came across a couple more that were very vibrant and a beautiful shade of blue, but I didn't have the right food coloring gel to make those cupcakes.  I also couldn't just run right out and pick up the needed colors because I am 45 minutes away from the nearest big store and my little country grocery store doesn't carry things like food coloring gel.  So, I searched through the gels that I had and this is what I came up with.  They were a deep dark blue which was perfect for our team color and thank goodness not a shade of green in them.  Best of all my daughter loved them! 

    These really aren't traditional blue velvet cupcakes because I used a box cake mix and added coloring.  A traditional velvet cake is made from scratch with buttermilk.  At some point, I would like to make a traditional velvet cake, be it red, blue or green, but for now I am completely happy with the results I achieved with my shortcut.

    Enjoy!


    Blue Velvet Cupcakes with 
      Cream Cheese Frosting
    (recipe by Wende Rickett/The Rickett Chronicles)

    Cupcakes
    Ingredients
    1 box white cake mix with ingredients as listed on the box
    1 tbsp cocoa powder
    2 tsp cornflower blue food coloring gel
    15 drops of blue food coloring (the liquid kind you dye your Easter eggs with)
    1 smidgen of red food coloring gel

    Directions
    Preheat oven to 350 degrees.  Line muffin pans with liners.  In a large bowl, following the cake mix instructions, add ingredients for cake and mix.  In a small bowl, add cocoa powder and food colorings, mixing to make a paste.  Add paste to cake mix bowl and mix until very well blended.  Scoop the batter into the cupcake liners filling about 2/3 of the way up.  Bake for 15 to 18 minutes or until done.  Allow to cool completely before frosting.

    Cream Cheese Frosting
    Ingredients
    1 8-oz package cream cheese, room temperature
    1/2 cup butter
    1/2 tsp vanilla
    pinch of salt
    4 to 5 cups powdered sugar, depending on the consistency you need
    1 to 2 tbsp half and half (or milk), if needed

    Directions
    Mix cream cheese, butter and vanilla until well mixed and smooth.  Add a pinch of salt and mix.  Add two cups powdered sugar to cream cheese mixture and beat until smooth and incorporated.  Add one cup of the remaining powdered sugar at a time until the desired consistency is achieved.  If it gets to thick, you can add a little half and half to thin it out a bit.  Put frosting in a bag and pipe onto cupcakes.


    Linked To:
    *Frugal Antics of a Harried Homemaker: Your Recipe, My Kitchen
    *Make Ahead Meals for Busy Moms: Melt in you Mouth Monday
    *Boogieboard Cottage: Masterpiece Monday
    *11th Heaven's Homemaker Haven: Homemaker Monday
    *Talking Dollar and Cents: Muffin Monday 
    *DIY Home Sweet Home: More the Merrier Monday
    *Delightfully Dowling: Mangia Monday
    *A Southern Fairytale: Mouthwatering Monday 
    *Marvelously Messy: Marvelous Mess 
    *Sumo's Sweet Stuff: Market Yourself Monday
    *The Girl Creative: Just Something I Whipped Up
    *Skip to My Lou: Made by you Monday
    *Project Queen: Turing the Daunting Into the Doable
    *Blessed with Grace: Tempt My Tummy Tuesday
    *All the Small Stuff: Tuesdays at the Table
    *Hoosier Homemade: Cupcake Tuesday
    *33 Shades of Green: Tasty Tuesdays 
    *Chef in Training: Tuesday Talent Show
    *Permanent Posies: Tuesday Tasty Tidbits 
    *Reasons To Skip the Housework: Tuesday Timeout 
    *My Sweet and Savory: Let's Do Brunch 
    *Bizzy Bakes: Bake with Bizzy  
    *Sweetology: Tea Party Tuesday
    *This Chick Cooks: These Chicks Cooked 
    *Stuff and Nonsense: Friday's Unfolded 
    *Designs by Gollum: Foodie Friday 
    *Miz Helen's Country Cottage: Full Plate Thursday
    *Talking Dollar and Cents: Sweet Tempations 
    *Somewhat Simple: Strut Your Stuff
    *What Allie's Making Now: Making It With Allie
    *A Glimpse Inside: Catch a Glimpse 
    *A Creative Princess: It's a Party!
    *Ali n'Son: Sweet Tooth Friday
    *Bacon Time with the Hungry Hungry Hippo: Anything Goes
    *EKat's Kitchen: Friday Potluck  
    *Six Sisters' Stuff: Strut Your Stuff Saturday
    *Sweet as Sugar Cookies: Sweets for a Saturday 
    *Be Different, Act Normal: Show and Tell Saturday 
    *Nifty Thrifty Things: Nifty Thrifty Sunday 
    *A Well-Seasoned Life: Sweet Indulgence 
    *LambAround: Not Baad Sunday 
    *J&M's Eye Candy: Strut Your Stuff 
    *Petite Hermine: Sunday Linky Party 


    Monday, July 25, 2011

    Recipe Review: Cherry Limeade Cupcakes


    Yum...cherry limeade drinks from Sonic are my favorite drink treat.  So, when I came across this recipe from It's the Life blog, I knew that I had to try it.  I signed up to feed the volunteers at Vacation Bible School and wanted to make something pretty and tasty.  These were perfect.  Not only are they pretty to look at but they taste so good!  The cupcakes were gone in no time and I received lots of compliments.  I will be making these again for an upcoming family reunion but will probably double the recipe because they were so awesome.  I will also use stemmed cherries as well....I think they will look prettier.

    Enjoy!

    Cherry Limeade Cupcakes
    (original recipe by It's the Life)

    Cupcakes
    1 box white cake mix (and all ingredients needed to make the cake)
    1 jar maraschino cherries (with or without stems)
    1 cup powdered sugar
    2 limes

    Buttercream Frosting
    1 bag powdered sugar
    2 sticks butter, room temperature
    1 lime
    milk

    To make the cupcakes, preheat oven and make the batter according to the package directions.  Add 3 to 4 tablespoons of the cherry liquid into the batter.  You could chop some of the cherries and add to the batter, but I wanted a smooth cupcake.  While the cupcakes are baking, make a lime glaze by mixing the juice of two limes with one cup of powdered sugar.  Once the cupcakes are removed from the oven, poke several (I did at least 10 to 12) holes with a toothpick in each cupcake.  With a spoon, slowly spoon the glaze on each cupcake, using the back of the spoon to spread it out covering each hole.  Allow the cupcakes to sit a few minutes and repeat the glazing.  Loosely cover cupcakes and refrigerate for a few hours.  While the cupcakes are cooling, drain the cherries and rinse them thoroughly.  Drain them on paper towels for a few hours.  (This step will ensure that the cherries don't bleed in your beautiful white frosting.)

    To make the frosting, beat the softened butter until fluffy.  Slowly add the powdered sugar, beating to ensure there are no lumps.  I used all but about a cup of powdered sugar because I like a stiffer frosting.  I had some leftover glaze, so I also added this along with the juice of one lime.  Add a little milk, if needed, to thin it out a bit.  Frost as you normally would.  Add the dried cherry to top of each cupcake.

    Linked To:
    *Lamb Around: Not Baad Sundays
    *The Girl Creative: Just Something I Whipped Up
    *Boogieboard Cottage: Masterpiece Monday
    *11th Heaven's Homemaking Heaven: Homemaker Monday 
    *Two Maids a Milking: Two Maids a Baking
    *Sumo's Sweet Stuff: Market Yourself Monday
    *Frugal Antics of a Harried Homemaker: Your Recipe, My Kitchen
    *A Southern Fairytale: Mouthwatering Monday 
    *Blessed with Grace: Tempt My Tummy Tuesday 
    *Dr. Laura's Adventures: Tasty Tuesday
    *Mandy's Recipe Box: Totally Tasty Tuesday 
    *From Mess Hall to Bistro: Made From Scratch Tuesday 
    *Lady Behind the Curtain: Cast Party Wednesday
    *It's a Keeper: It's a Keeper Thursday
    *Sweet as Sugar Cookies: Sweets for Saturday
    *Everyday Sisters: Sharing Sundays 
    *Hoosier Homemade: Cupcake Tuesday


    Sunday, May 15, 2011

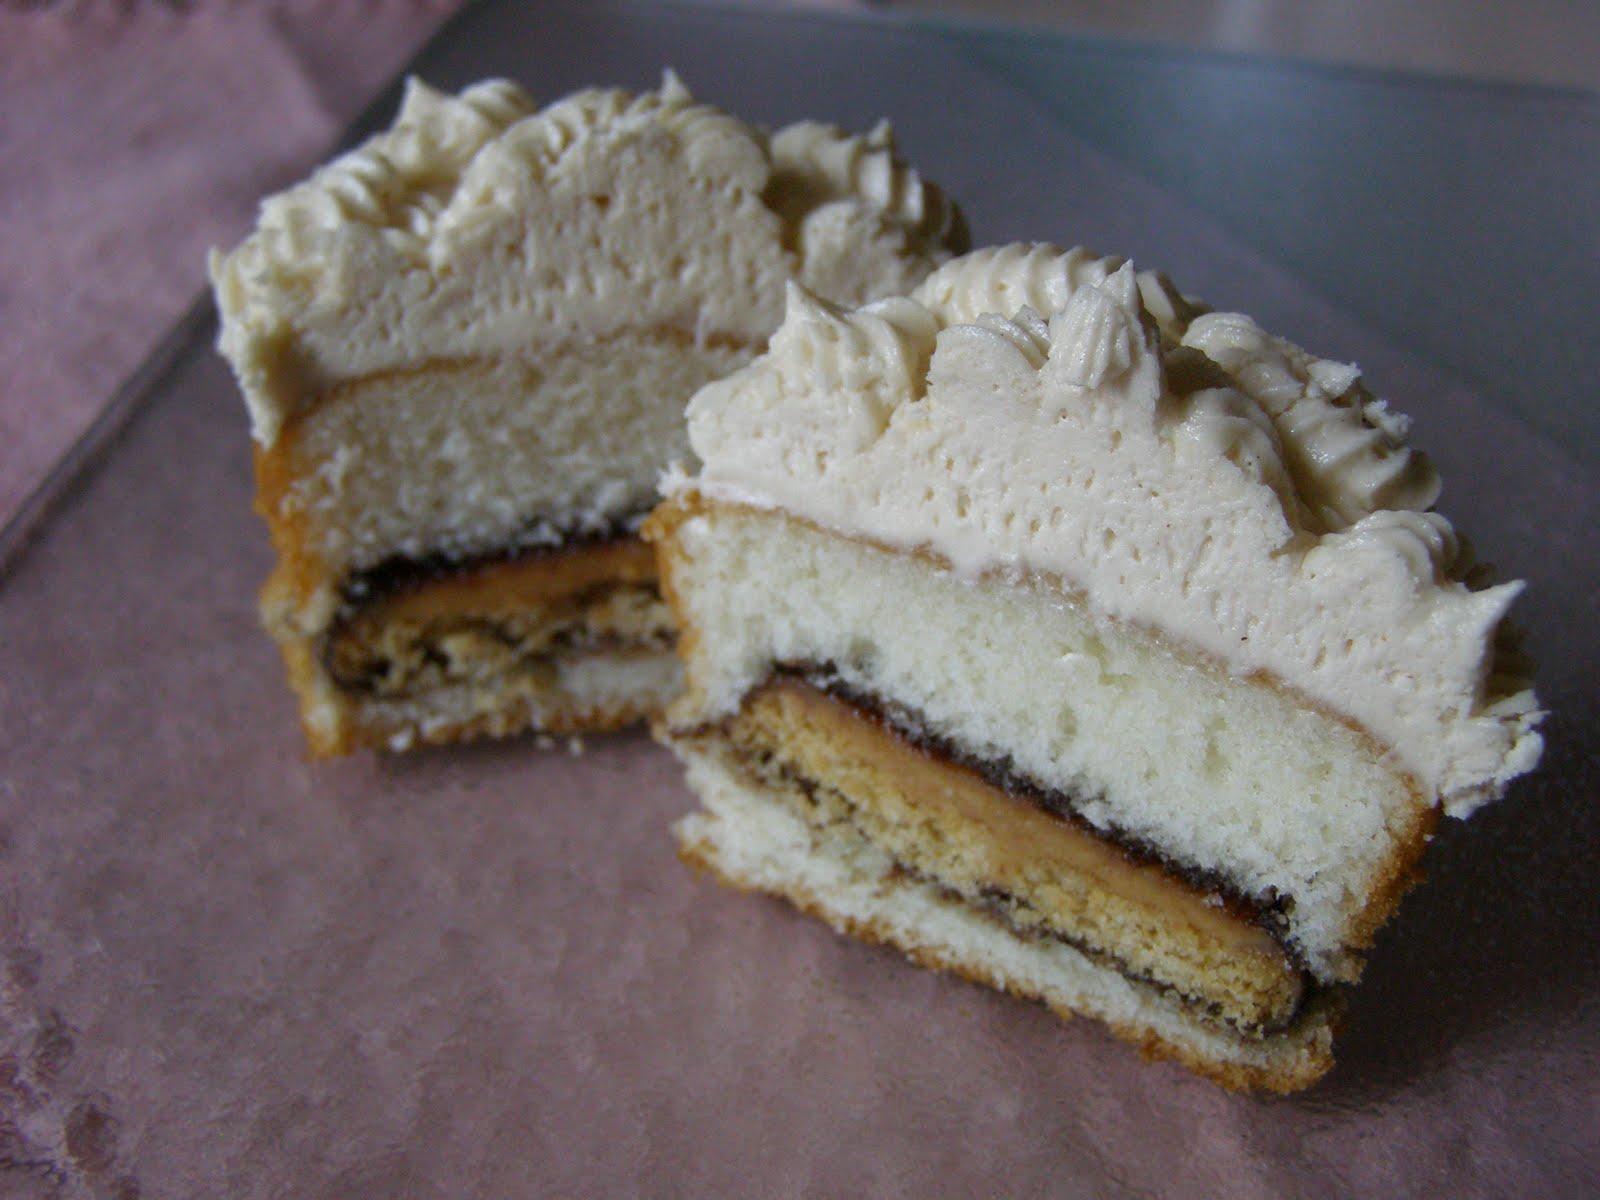
    Recipe Review: Tagalong Cupcakes


    I have been wanting to make these cupcakes for months.  This recipe comes from one of my favorite blogs, InsideBruCrew Life.  She has the most awesome recipes!  I saved back a box of Tagalongs with this recipe in mind.  Boy, I am so glad I did!  These were so so very good and my family has eaten them up.  I love the fact that they are made with a box cake mix...saved me some time.  If you have a box of Tagalongs stashed away somewhere, you must give these a try!

    Enjoy!


    Tagalong Cupcakes

    1 vanilla cake mix 
    Tagalong Cookies (from your favorite Girl Scout)

    Preheat oven to 350* Place liners in cupcake pan. Make up the cake mix according to the directions. Put 2 tablespoons of batter in each liner. Set a cookie on top of the batter in each liner and then finish filling the liner with batter. Fill it at least 3/4 of the way full. Bake 22-24 minutes. Let cool. Frost with Honey Peanut Butter Cream. Add sprinkles and eat!

    Honey Peanut Butter Cream
    1 cup butter, softened
    1/2 cup peanut butter
    2 tbsp water
    2-4 tbsp honey
    1 tsp vanilla
    1/8 tsp salt
    4 cup powdered sugar

    Cream butter and peanut butter. Add the water, salt and vanilla and cream again. Slowly add the powdered sugar. After all the sugar is added, beat in another 1-2 tbsp water. Then beat in the honey until creamy. 


    Photobucket

    Wednesday, January 19, 2011

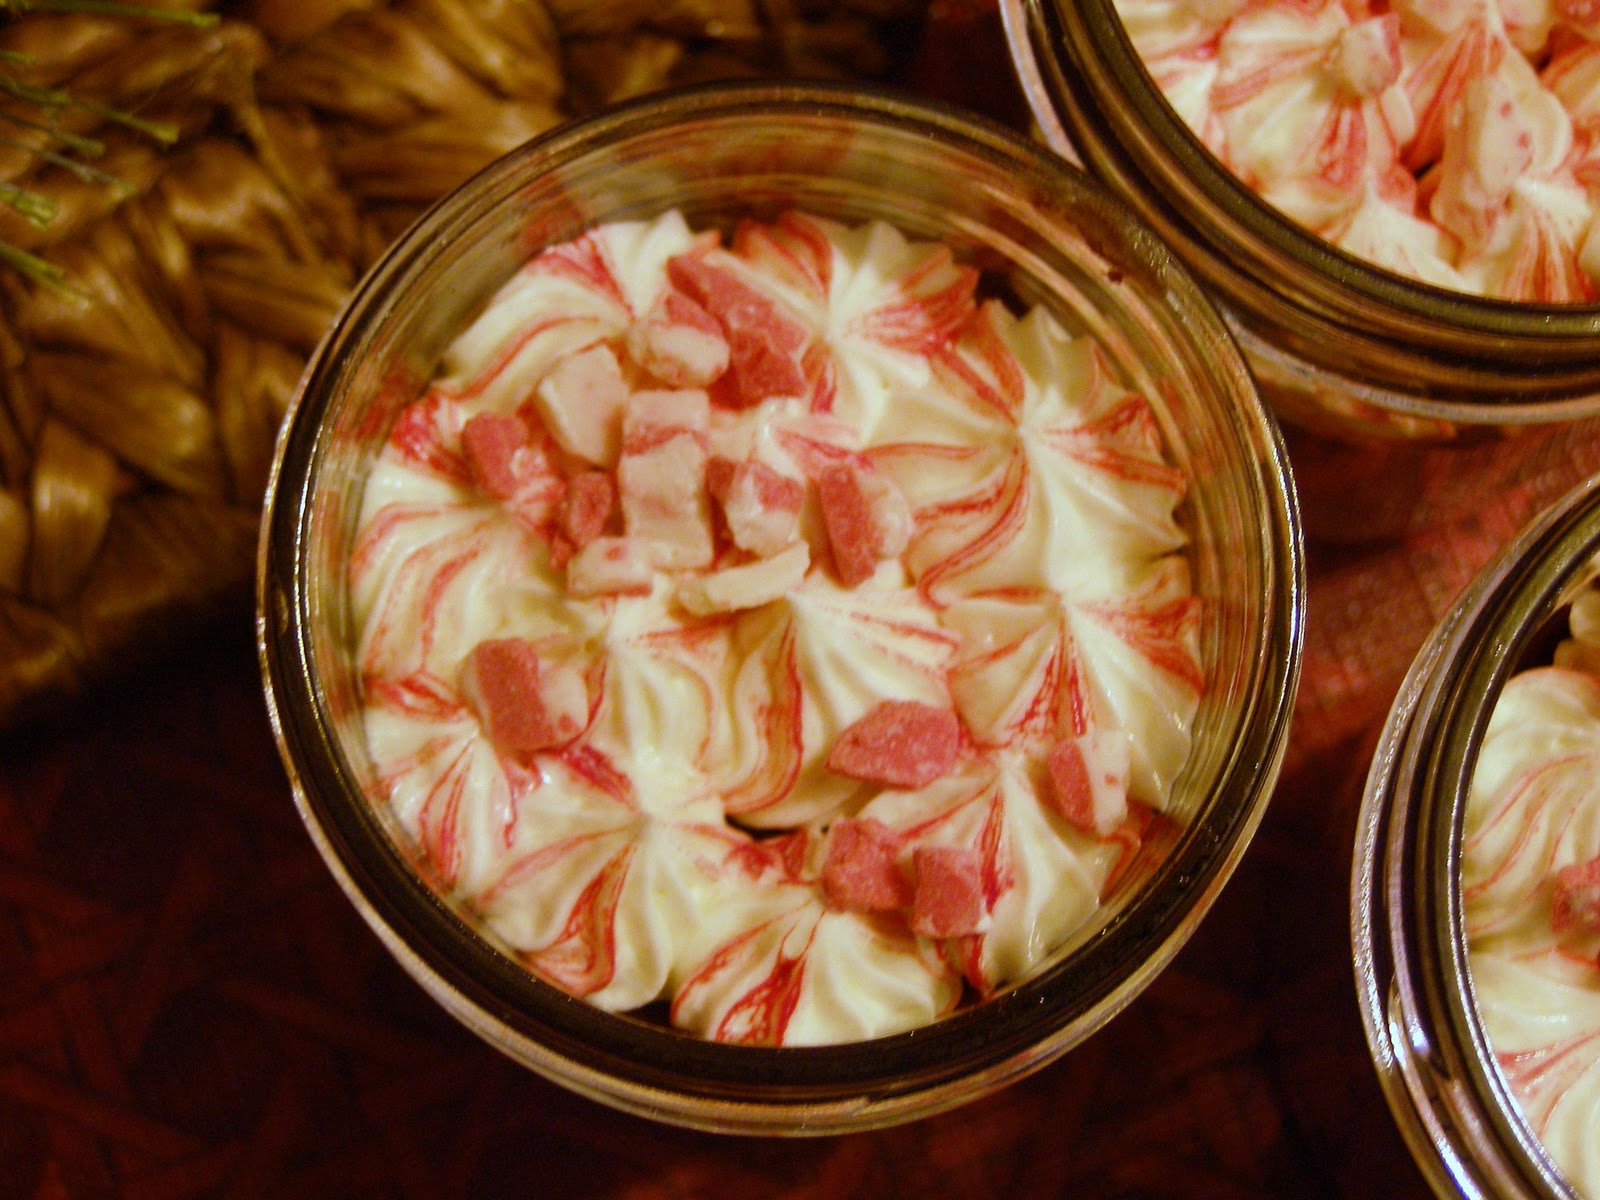
    Gifts From My Kitchen: Peppermint Fudge Cupcake Jars


    Right before the holidays, I was reading through one my absolute favorite blogs, Our Best Bites, looking for teacher's gifts to make and came across this...cupcakes in a jar!  I know right?  Can you believe it?  How stinkin' cute are they and so different?  And really very easy.  They were a hit.  Not only did they taste good but they were so pretty.  While these were made for Christmas, why not for Valentine's?  I could not find the wide mouth jars anywhere in my town, so I used what I had on hand, the regular size jars.  I didn't have any problems with the size difference.  I was able to find Andes candy in red and white bits that was perfect as a topping.

    I made the decorating simple.  I covered the top of the jar with the lid and put a cupcake liner upside down and flattened the bottom of the liner and then screwed the ring over the liner.  Instant and easy! 

    You really REALLY need to give these a try.  Perhaps for your Valentine!

    Enjoy!


    Peppermint Fudge Cupcake Jars
    (recipe from Our Best Bites)
    Makes approximately 8 jars or 12 Cupcakes

    Cupcakes (cake base for this dessert adapted from Shelly Kaldunski)
    2/3 cup all-purpose flour
    2 1/2 tbsp unsweetened cocoa powder
    3/4 tsp baking powder
    1/4 tsp salt
    3 oz chocolate, chopped. (or abt 1/2 C chips) Use bittersweet, dark, or semi-sweet.
    1/2 C + 3 tbsp real butter, cut into pieces
    3/4 C plus 2 tbsp sugar
    3 large eggs, at room temperature
    1 tsp vanilla extract

    8 8oz wide mouth mason jars (or regular if you can't find wide mouth)

    Preheat oven to 350 degrees. Place the chocolate and butter in a large heatproof bowl and microwave in 30 second intervals, stirring after each, until melted and smooth. Set mixture aside and let cool 10-15 minutes. In a separate bowl, whisk together the flour, cocoa powder, baking powder and salt. Using a wooden spoon (don't use an electric mixer) stir the sugar into the chocolate mixture until combined. Stir in the eggs one and a time, beating with your spoon until combined after each addition, and then beat in the vanilla. Gently fold in the flour mixture just until no traces of flour remain; do not over mix.

    Place the mason jars on a cookie sheet. Divide the mixture evenly among the 8 jars (no need for greasing the jars) or 12 cupcake liners if you're going that route. The jars should be about half full or a little less. Bake until a toothpick inserted into the center of the jar comes out with only a few moist crumbs attached 22-25 minutes. Remove from oven and carefully (with a pot-holder!) transfer jars to a cooling rack. Let jars cool till at least close to room temperature before topping with ganache.


    Peppermint Ganache
    4 oz semi-sweet chocolate (chocolate chips are fine)
    1/2 C heavy cream
    1/4 tsp peppermint extract

    Place chocolate chips in a bowl. Heat cream in microwave until bubbles form around the outside. Pour in bowl over chocolate chips and immediately cover bowl with plastic wrap. Let sit for 5 minutes, add peppermint extract and then whisk until smooth. Let cool uncovered until thickened slightly, almost like a thin pudding.

    To assemble, pour 1 1/2-2 Tbs ganache over the top of each cupcake jar. If desired, use a paring knife to first hollow out a well in the middle of the cake. Tilt jars to distribute ganache evenly over the top of the cake and then let cool for the ganache to set. If storing overnight, place lids and rings on jars and leave at room temperature.

    Frosting
    3 tbsp flour

    1/2 cup milk (whole milk is best)
    1/2 cup real butter
    1/2 cup sugar (that's granulated sugar, not powdered sugar)
    1 t vanilla extract
    1/2 tsp peppermint extract

    Whisk together the flour and the milk. Heat in a small sauce pan on medium heat. Whisk continuously until it starts to thicken. Let it cook, while stirring, until you can start to see the bottom of the pan. It should still be liquid-ish.  It's okay if you have lumps, because we're gonna strain those out right now. Place the mixture in a mesh strainer and stir with a rubber spatula to push it through. You should end up with a nice, smooth mixture. It's almost like pudding before it's set.

    Put this mixture in the fridge and let it cool completely, it's fine if it stays in there long enough to get chilly, you just don't want it warm at all. When it is chilled, you can move on to the following step.

    In an electric stand mixer, beat the butter and the sugar for a minute or two until well combined and fluffy. You'll want to use the whisk attachment on a stand mixer, not the flat paddle. Then while beating, add in the thickened
    milk mixture and the vanilla. Beat to combine and then scrape down the sides. Don't be scared. It's going to look like a goopy mess and kind of lumpy and separated.  Beat on med-high for 7-8 minutes. After 7-8 minutes it will have transformed from that sloppy mess into something gorgeous, fluffy, and incredibly light and silky.

    (See instructions on the Our Best Bites blog for creating a red and white striped look.) Pipe frosting on each jar, being careful to leave room for the lid. If desired, sprinkle on some crushed candy canes or candies and then screw on jar lids.


    Linked To:
      * Blessed with Grace:  Tempt My Tummy Tuesday
      * It's A Blog Party:  Delicious Dishes
      * A Beautiful Mess:  Wordless Wednesday
      * All the Small Stuff:  Tuesdays at the Table
      * Not So Homemade:  What's Cooking Wednesday
      * From my tiny kitchen:  Gold Star Wednesday
      * We are THAT Family:  Works for me Wednesday
      * Simply Sweet Home:  Friday Favorites
      * Prairie Story:  Recipe Swap Thursday
      * Mommy's Kitchen:  Potluck Sunday
      * Sister Sister Sunday
      * Miz Helen's Country Cottage:  Full Plate Thursday
      * It's A Hodgepodge Life:  Hodgepodge Friday
      * Alli-n-son:  Sweet Tooth Friday


    Photobucket

    Saturday, January 1, 2011

    Countdown to 2011: Desserts

    Okay, so I am a day late in this post but I wanted to share some of the desserts I made over the past year.  I am joining Finding Joy in My Kitchen's countdown. 

    Here is some of the delightful goodness we enjoyed!


    ~~~~


    ~~~~


    ~~~~


    ~~~~


    ~~~~


    ~~~~


    ~~~~


    ~~~~


    ~~~~


    ~~~~


    ~~~~

    Monday, August 2, 2010

    Recipe: Banana Walnut Cupcakes


    I know that I have said it before, but I do not like bananas.  However, I LOVE banana bread, banana muffins and now banana cupcakes!  These are sooooo good!   I found this recipe while watching Down Home with the Neely's (love that show!).  I used Steen's Syrup instead of molasses because I think it has way more flavor than regular molasses.  I made 15 cupcakes with the recipe.

    This is a must try!

    Banana Walnut Cupcakes
    (modified from Gina Neely's recipe)

    Batter:
    1 cup all-purpose flour
    1/2 teaspoon baking powder
    1/2 teaspoon baking soda
    1/4 teaspoon salt
    1 stick butter, softened
    1/2 cup sugar
    1/4 cup sour cream
    1 1/2 teaspoons vanilla extract
    2 large eggs
    2 large ripe bananas, peeled, and mashed
    1/2 cup chopped walnuts, (reserve some for garnish)

    Molasses Frosting:
    3 tablespoons whole milk
    1 1/2 teaspoons vanilla extract
    2 tablespoons butter, softened
    4 ounces cream cheese, softened
    2 tablespoons Steen's Syrup (or molasses)
    3 cups powdered sugar

    Directions
    Batter:
    Preheat the oven to 350 degrees. Line 1 (12-cup) muffin pan with paper cupcake liners.   In a medium bowl, combine the flour, baking powder, baking soda, and salt. Set aside.

    In a large bowl, add the butter and the sugar. Beat with a mixer until combined. Add the sour cream and the vanilla extract. Slowly beat in the eggs, one at a time. Incorporate the dry mixture and wet mixtures together until thoroughly combined. Add the bananas and walnuts, being careful not to over mix. Using an ice cream scoop, fill each cupcake liner 3/4 way full. Bake in the preheated oven until the tops turn golden-brown and when a toothpick, inserted in the middle of the cupcake, comes out clean, about 20 minutes. Remove the cupcakes from the oven to a wire rack and let cool before frosting.

    Frosting:
    In a large bowl, add the butter and cream cheese. Beat together until incorporated. Add the molasses and mix well. Stir in the vanilla extract, milk and powdered sugar.

    Heavily frost the cupcakes and garnish with reserved chopped walnuts.


    Linked To: